
DIY Temperature and Humidity Logging System
Vision
I wanted to find a low-cost, open-source, and accurate solution for logging temperature and humidity in various rooms of a building. I used a microcontroller board based on the Espressif ESP32 to send data via Wi-Fi to Adafruit IO, a data storage and visualization service that is free for up to 10 feeds at up to 30 data points per minute (or, in the future, any connected server using the MQTT message protocol). These microcontroller and sensors are compatible with the ESPHome plug-in for HomeAssistant. ESPHome allows for simple programming, remote firmware flashing, and easy data collection on a locally hosted HomeAssistant server. I wanted the sensors to be compact, long-lasting, and virtually maintenance-free by making them USB-powered instead of using a lithium battery pack.
Parts List
(Prices as of September 2024)
- Adafruit QtPy ESP32-S3 Microcontroller $12.50
- Adafruit Sensirion SHT41 Temperature and Humidity Breakout Board $5.95
- Adafruit 50mm JST-SH 4-Pin Cable $0.95
- ~12 grams PLA 3D printer filament $0.24 (@ $20.00 / 1000g spool)
- 1x M3 Screw 8mm Long $0.08 (@ $8.00 / 100 pack)
Approximate cost per sensor = $19.72
The cost could absolutely be reduced further, mainly by using generic ESP32 development boards off of Amazon. While those may be larger and harder to work with, the Adafruit QtPy is about the smallest size you can find while still being packed with features like USB Type-C, a plug-in I2C port, and an onboard RGB NeoPixel.
Not Included in Cost Estimate
- USB 2.0 A to C Cable – Use pretty much any generic cable.
- USB A 5V Power Supply – Use any name-brand, preferably UL-listed, USB power brick that came with an old device.
Specs of the SHT41
While it doesn’t have a NIST calibration certificate, Sensirion provides extensive documentation on their SHT41 sensor. According to their datasheet, it features a typical relative humidity accuracy of +/- 1.8% with a resolution of 0.01%, and a long-term drift of <0.2% RH. It also features a typical temperature accuracy of +/- 0.2°C, a resolution of 0.01°C, and a long-term drift of <0.03°C/year.
This sensor also has a built-in, very small (<200mW) heater, similar to other comparable sensors on the market. The purpose of the heater is to help correct inaccuracy in the humidity sensor after it is exposed to a very high-humidity environment where it can become “saturated.” After my testing, I concluded it was not necessary to run the heater during regular operation, given that the typical humidity range in a climate-controlled house is 45% to 55%.
Programming
I programmed the Adafruit QtPy ESP32-S3 with the Arduino IDE because it was the simplest way to get up and running quickly. You can also program the ESP32 in C with the ESP-IDF, in VS Code with the PlatformIO module, or in Python using CircuitPython.
Finishing Touches
I designed a 3D-printable case for the microcontroller, sensor, and their connection wire. I kept the case as slim and as long as possible to keep the heat-producing ESP32 far away from the temperature sensor. I also included a hole to access the reset button, a thin spot in the plastic to diffuse the status LED, and pockets for gluing in 10mm x 3mm round magnets.
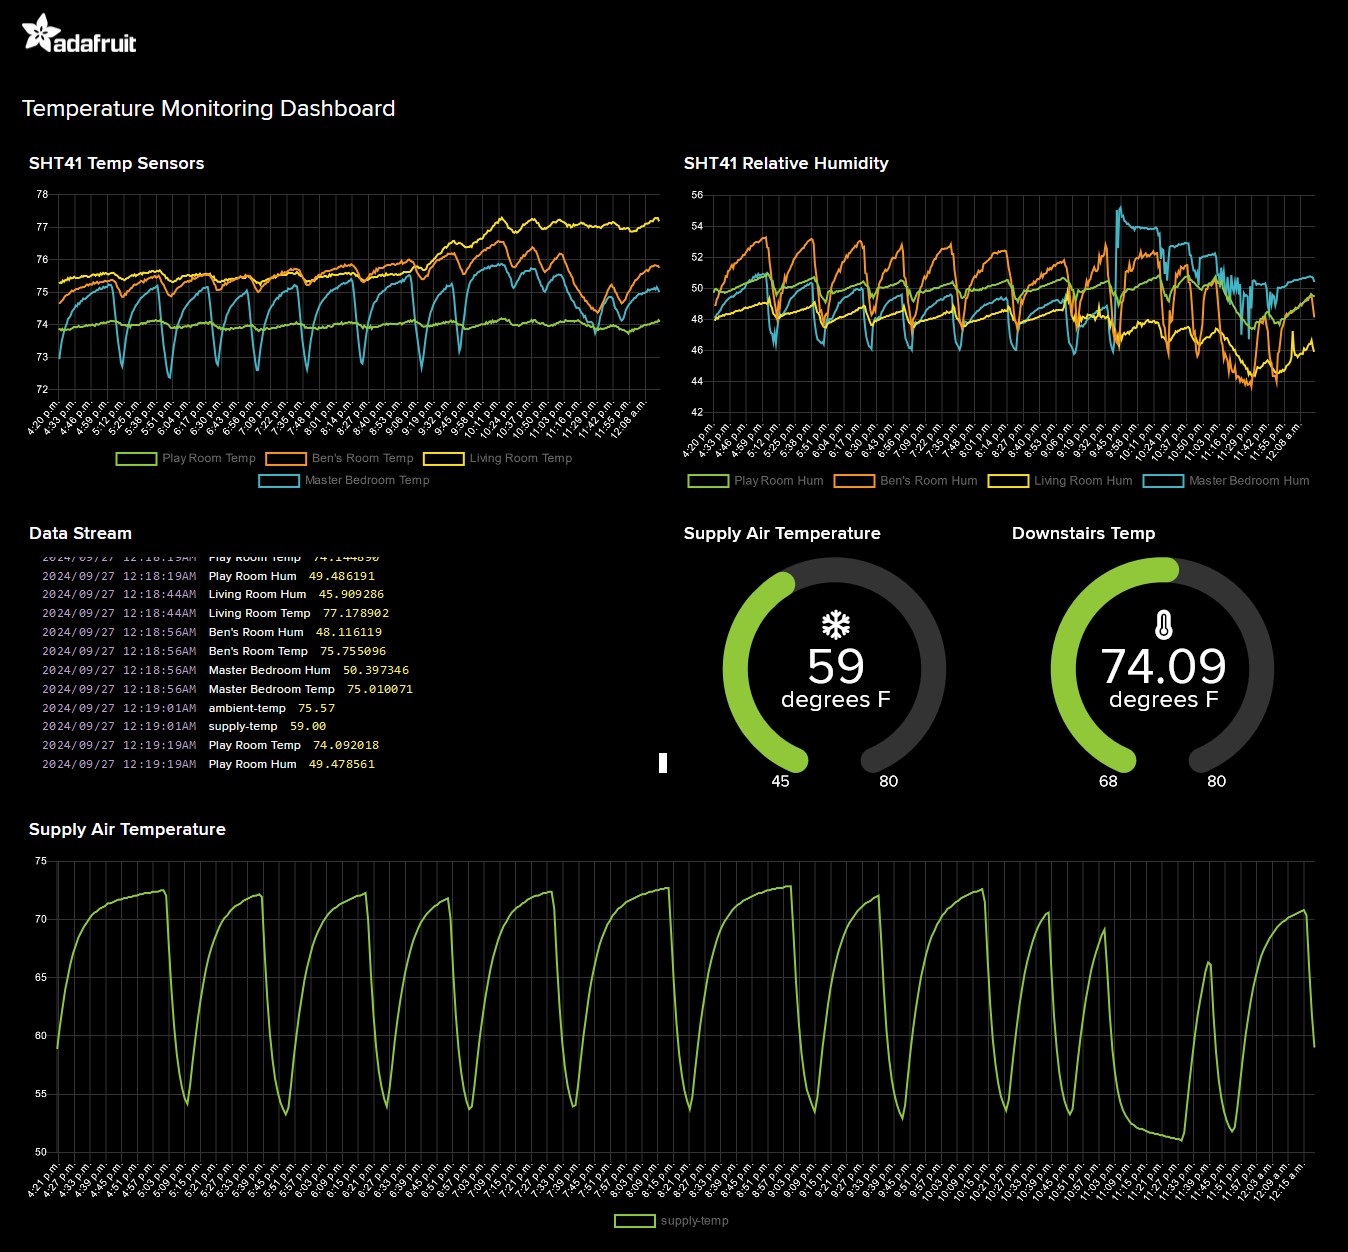
I distributed the sensors across our two-story house: two upstairs and two downstairs, all in rooms on opposite sides of the house that receive different sun exposure. The data is pushed to a line graph of all four sensors in Adafruit IO, and I can download up to 30 days of stored data at a time in CSV file format. I have also written a basic Python script with the help of Google Colab and ChatGPT that runs calculations and displays visualizations of the data using pandas, matplotlib, and bokeh.
Useful Performance Data
One of the most useful parts of having this data is the ability to keep tabs on the health and performance of the house’s HVAC system (a new dual-fuel system with a RUUD two-stage 15 SEER heat pump combined with an Aqua-Coil Hydronic Heating Coil, and a highly programmable Honeywell Vision Pro 8000 thermostat). Having this data allowed me to perform basic calculations to obtain an estimated heating and cooling load, rather than hiring an HVAC engineer to perform an ACCA Manual J Residential Load Calculation.
This showed me how the two-stage heat pump would be able to produce more than the required amount of heat in the winter while maintaining a coefficient of performance (COP) of 2.7 down to a 17°F outdoor temperature—even if it wasn’t assisted by the natural gas-heated hot water flowing through the coil. That’s 270% efficiency below freezing! For every 1 kW of electricity you pay for, you get 2.7 kW worth of heat out of the vents.